Testing your amplifier matters for good sound and longer life. You can test an amplifier at home with basic tools and checks.
This article shows you ways to check power, output, and connections. You will learn how to test an amplifier step by step. You fix faults before they get worse.
Can you test an amplifier on your own? Yes, and here’s how you do it the right way.

Your amplifier makes music sound richer by amplifying weak audio signals from your devices. But sometimes the amp stops working right, and then you need to know how to test an amplifier.
We will discuss everything from ‘how to test an amplifier at home’ and ‘how to test an amplifier to see if it works’, even if you’re not a pro. We also explain what an amplifier is and the difference between weak signal amplifiers and power amplifiers, so you know exactly what you’re testing.
Testing an Amplifier- All That You Need to Know
By testing an amplifier, you make sure your audio stays strong and clear. Learn key steps, from safe setup to checking outputs, so you’re always confident about your equipment.
Safety Warnings and Precautions Before Amplifier Testing
Safety always comes first when you’re testing an amplifier at home.
- Start by unplugging the amplifier and letting all stored energy dissipate. Capacitors can hold a dangerous charge long after the power is off.
- Wear safety glasses and insulated gloves. It may sound overcautious, but it can save you from injury if something sparks.
- Never work alone, especially when dealing with high voltage or unknown faults.
- Make sure your workspace is clear of drinks, clutter, and anything that could accidentally cause shorts or get knocked over.
- Inspect test leads and wires for cracks or wear before using them.
- When you test live circuits, always use insulated tools and avoid jewelry that could touch a component.
- Finally, know your limits. If at any point you’re unsure or uncomfortable, stop and get help. Taking the time to do it right ensures both your safety and the health of your amplifier.
Understanding Amplifier Basics: Key Components and Terms

An amplifier does one main job – it takes a small electrical signal and makes it strong enough to drive a speaker. To do this, it needs a power supply, which turns household or car battery power into the right type that the amplifier can use.
- The sound comes in through the input jacks.
- Inside, you will see transistors or op-amps, which take care of amplifying the signal.
- Capacitors remove noise and keep the sound free of hum.
- Resistors decide how much current moves along the circuit and help set the amplifier’s gain.
Key electrical ideas matter when you test.
- Voltage is the electrical “push” that powers the amplifier.
- Current is what actually flows inside the wires.
- Resistance holds that flow back, keeping things safe and balanced.
- Power is what gets delivered to the speakers—it is the result of both voltage and current together.
As you test an amplifier, check the power supply first, then follow the signal from the input through to the output. Step by step, you see how well each area works. If you spot a drop or strange reading, you will know where to focus your attention next.
For those who know, testing an Amplifier will always prove an easy task. However, for those who don’t, it can be tricky and confusing, sometimes even dangerous. Since it is an electric item, any wrong step will undoubtedly lead to damage, even ones that can’t be undone. Therefore, before you begin testing, always make sure you know the right method. If not, consider asking a technician to teach and perform the needful for you for that particular time.
Visual Inspection: First Look for Any Signs of Damage

Start testing by carefully inspecting your amplifier for any visible damage. Check all wiring for cuts, loose strands, or broken connections. Look over the amplifier’s casing and circuit boards for burn marks, swollen or leaking capacitors, and corrosion. If you spot damaged parts, replace or repair them before moving on. Don’t ignore dirt or dust buildup as it can cause overheating. Use a bright light and a magnifier to see small cracks or solder breaks. Make sure no wires touch and that all clamps are tight. Check that all fuses are intact and matched to the correct rating. Early detection helps prevent bigger problems and protects your amplifier from further damage.
Sample Checklist:
Damaged or loose wires
Burn marks or discoloration
Swollen, leaking capacitors
Corroded connections
Dust and dirt buildup
Loose solder joints
Proper fuse rating and condition
How to Test an Amplifier with a Multimeter?
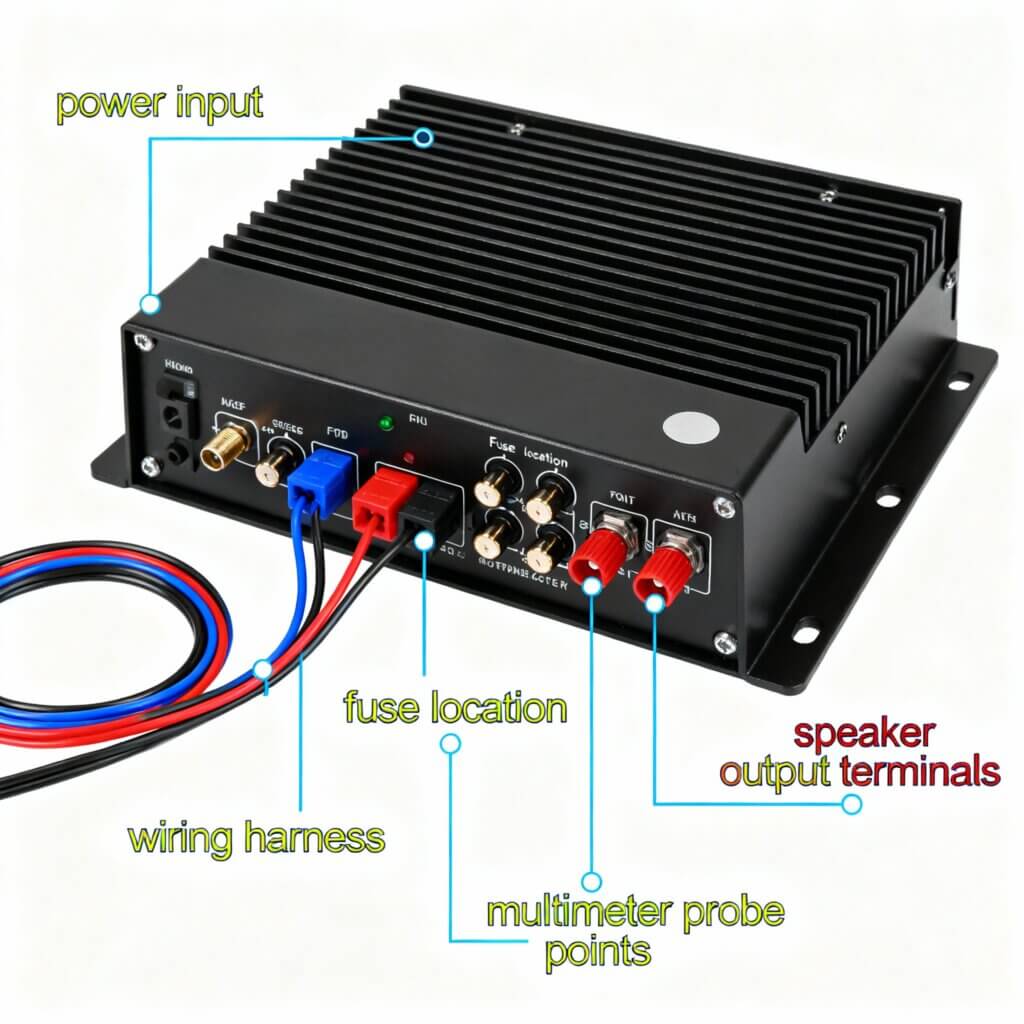
If you want to test an amplifier with a multimeter, start by checking the power supply with these steps:
Locate the amplifier’s positive power wire connected to the battery or power source, and the ground wire connected to the vehicle chassis.
Set your multimeter to DC voltage mode. Select a range that covers up to 20 volts or more.
Place the black probe on the ground wire or metal frame to serve as reference. Place the red probe on the positive wire to measure voltage.
Check the voltage reading. The amplifier is getting proper power if the reading is between 11 and 14 volts. Readings outside this range indicate a power issue.
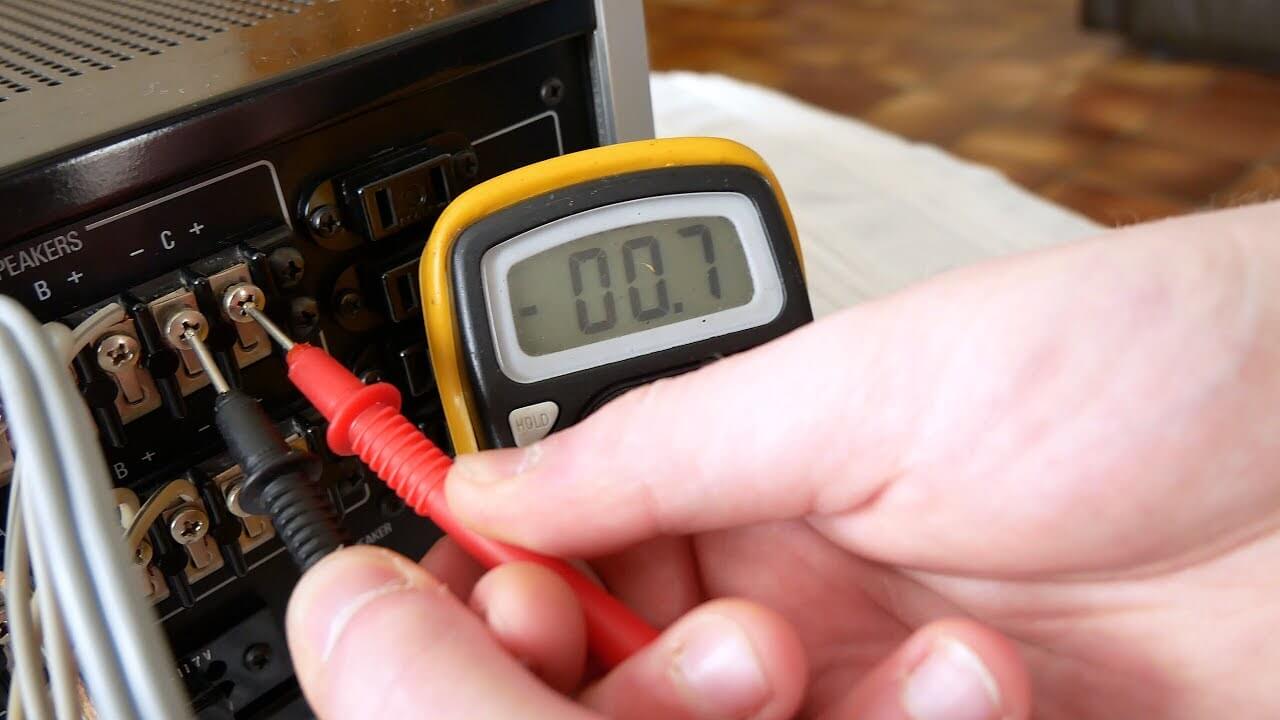
To test the fuse, remove it from the fuse holder. Switch your meter to resistance or continuity testing. Place probes on both ends of the fuse.
A low resistance reading means the fuse is intact. A high or infinite resistance point means the fuse is broken and needs replacement.
Once fixed, check voltage again to confirm stable power supply to the amplifier.
Using clear wiring diagrams to show probe placements makes this test easier and safer. This process ensures your amplifier’s power side is working correctly before moving to more complex tests.
Amplifier Continuity and Wiring Test
Use a multimeter to test for wiring issues and continuity in your amplifier using these steps:
Power off the amplifier and unplug it from any source.
Switch your multimeter to continuity or resistance testing mode.
Select two points to check, such as both ends of a cable or fuse.
Place the probes on these points one at a time.
A beep or low digital reading confirms continuity—good wiring.
A silent meter or high resistance means the wire is broken or there’s no connection.
Test all suspect wires carefully to find faults.
Look for any wires that touch others improperly, which causes shorts.
Fix or change damaged wiring or connectors before proceeding.
Remember, working on wired electronics can be dangerous. Power off equipment and avoid touching exposed metal with bare hands. Use protective tools and work in well-lit areas for your safety.
Speaker Output Test With Known Good Speaker
Start by connecting a speaker you know works properly to the amplifier’s output terminals. Turn on the amp and play some music or a test tone at a low volume.
Listen carefully for clear and steady sound. You want the audio to be free from crackling, distortion, or silence. If the sound is weak, distorted, or missing, check the wire connections first to make sure they are secure and correct.
Slowly raise the volume and notice if the sound stays consistent without cutting out.
lso, use a speaker with the right resistance for your amplifier to avoid damage.
This test helps you figure out if the amplifier is sending the correct signal to the speaker. If you hear problems, you may need to look deeper into the amp or wiring.
Signal Injection Test: Tracing Audio Through Amplifier Stages
To check audio flow in an amplifier, inject a known test tone. You can use a simple signal generator for this purpose. Injecting the signal at the output is easiest, then work your way toward the input stage.
Watch how the signal behaves at each stage.
Use a signal tracer or convenient audio measurement tool.
A clear strong signal means the stage is working; a weak or lost signal indicates a problem nearby.
Signal distortions or interruptions help identify faulty parts.
Step-by-step tracing helps you pinpoint issues precisely, reducing guesswork and saving repair time.
Gain Test: How to Measuring Input vs Output Voltage
Gain tells you how much your amplifier boosts the input signal. It’s important to avoid too little or too much boost, which causes poor sound or harm.
To measure gain, play a test tone and set your multimeter to AC voltage. Put the probes on your amp’s output terminals carefully. Turn the gain control slowly while watching the multimeter reading.
When the voltage reaches the target level (found by multiplying your watt output by speaker resistance and taking the square root), your gain setting is good.
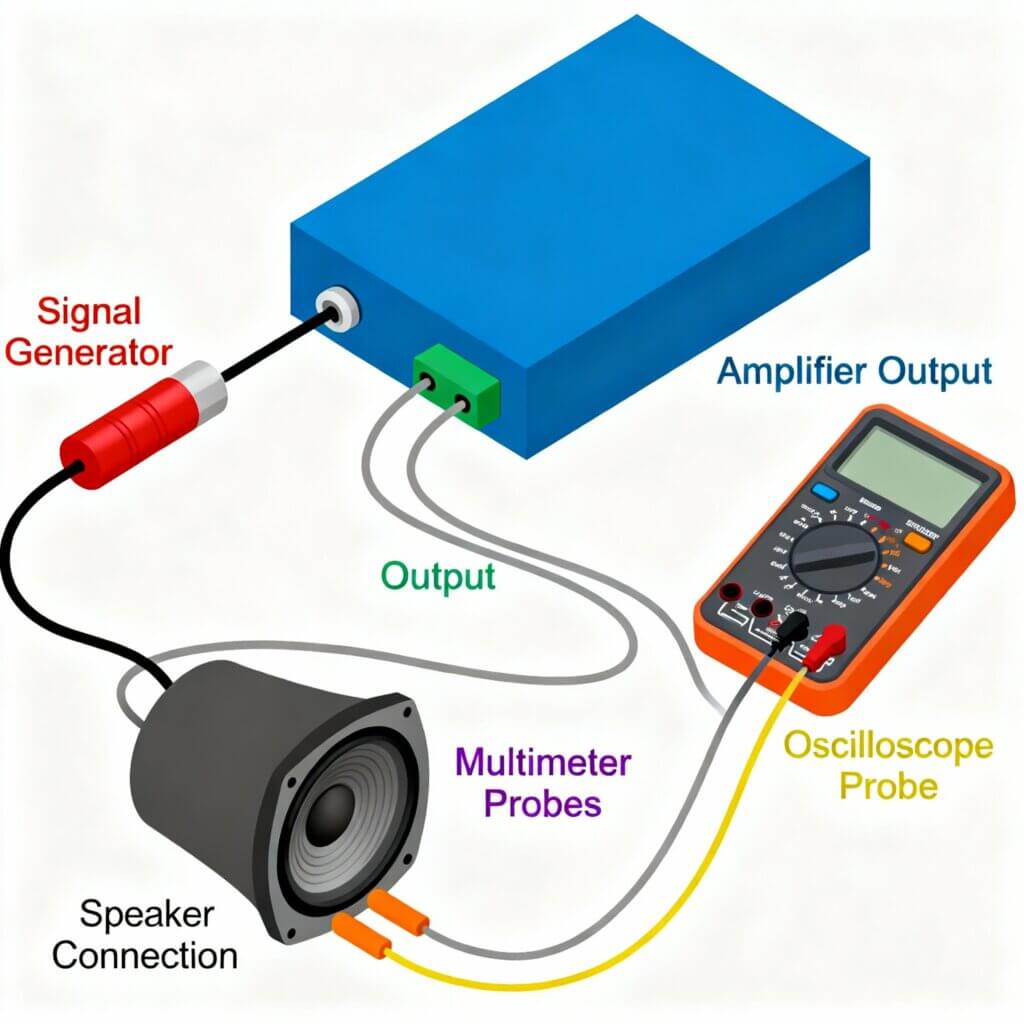
How to Test an Amplifier Output with an Oscilloscope?
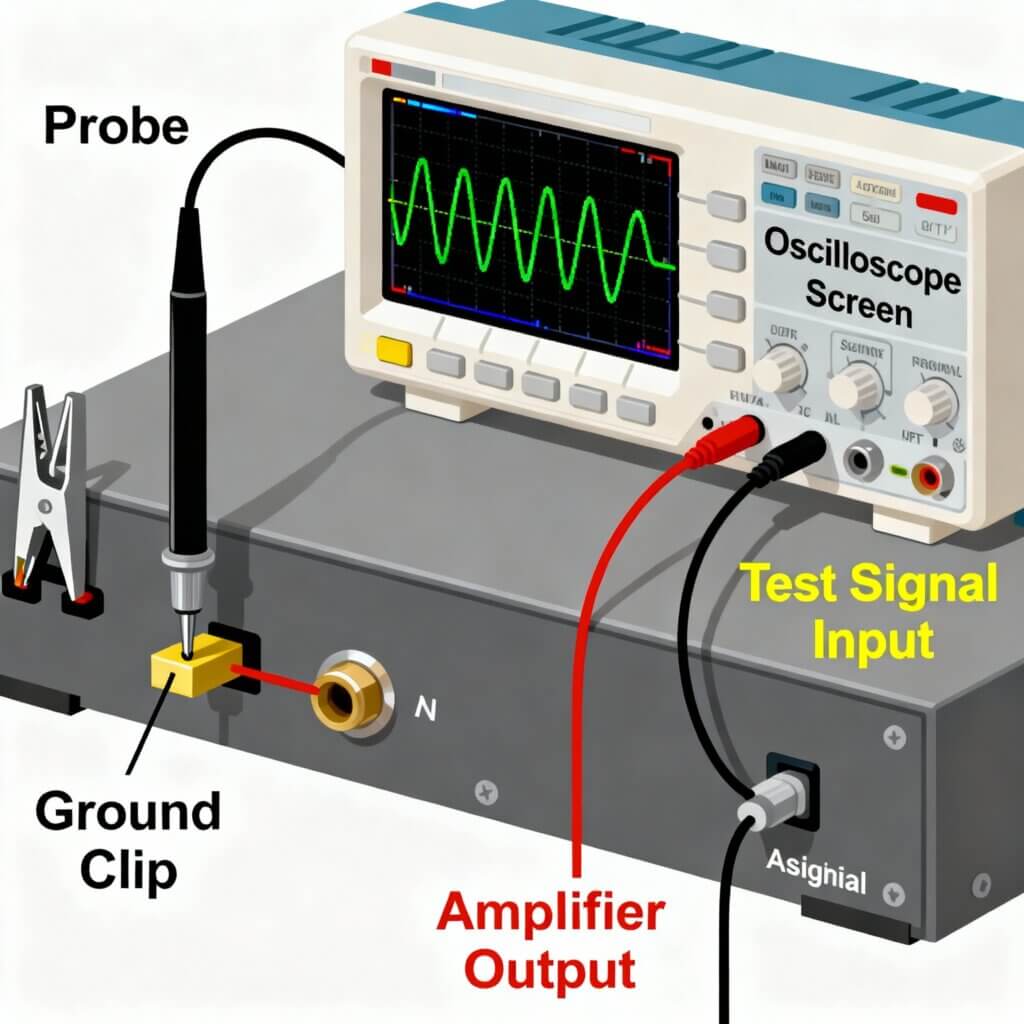
An oscilloscope helps you test an amplifier by showing the output signal’s shape and quality.
- To test an amplifier circuit, connect the scope probe to the output terminal and the ground to the amp frame.
- Set the signal generator to send a steady sine wave in, and watch the waveform on the screen.
- A smooth wave means the amplifier is working well. If you see clipping or distortion, the amp may be running too hot or have faulty parts. Noise on the signal can mean electrical problems. Adjust oscilloscope settings until the waveform fills the screen but doesn’t blur.
- Be careful to secure the ground lead to avoid shocks.
- You can test an amplifier’s gain, clipping point, and noise level this way.
Affordable oscilloscopes like the OWON VDS1022I provide clear results for home use. Using a scope takes some practice but gives detailed insight into amp performance.
Frequency Response Test: Sound Consistency Across Spectrum
To test an amplifier’s frequency response, you play a tone that moves from bass to treble and watch how the output changes. This tells you if the amp treats all sounds fairly. Ideally, output should not vary much across the sound spectrum.
You can use sweep test signals with a signal generator or software with an audio interface. Look for a consistent output level across frequencies from 20 to 20,000 Hz. If the response dips or spikes, your amp may be coloring the sound. Tools like REW software let you run these tests at home.
This test shows how true the amplifier is to the original music. A flat frequency response means you get honest sound reproduction.
Load Test: Monitoring Amplifier Heat and Performance
Performing a load test means attaching the amp to a resistor like a speaker or a dummy load to simulate real use. Then, play a steady audio signal and observe performance. The amp should deliver consistent power without overheating or shutting down.
If it runs hot or stops, it might be damaged. Keep an eye on output power and temperature during the test.
A healthy amplifier stays cool and delivers stable sound. This test helps you test an amplifier and ensures it works under a proper load.
Noise and Hum Test: Checking for Unwanted Sounds at Idle
- To check for noise or hum, power on the amplifier without music playing.
- Pay attention to any hissing or buzzing sounds. These noises usually come from weak grounding or interference.
- Make sure cables and plugs are tight and use shielded cables if possible. Ground loops between devices can cause hum, which requires better wiring or isolators to fix.
- Older or faulty internal parts can also cause noise. Removing hum and hiss is a key part of how to test an amplifier to see if it works well.
A quiet idle state means a good amplifier.
Amplifier Total Harmonic Distortion (THD) Test
THD shows how much your amplifier distorts the sound signal. If THD is low, your music sounds pure.
You can test this with special meters or software that sends test tones and records how much distortion your amplifier adds. Usually, amps with THD less than 0.1 percent sound clean. Testing THD is part of how to test an amplifier circuit professionally. It helps identify if the amp is working well or needs fixing.
If distortion looks high, your sound quality suffers, and you should look at repairs or adjustments. Testing THD is simple if you have the right tools and helps you understand your amplifier’s real performance.
Temperature Test: Evaluating Amplifier Heat Under Use
Check the temperature of your amplifier while it’s playing for some time. Heat can cause amps to fail if it stays too high. Use a surface thermometer or thermal camera to measure heat, focusing on vents, heat sinks, and casing.
Most amplifiers run safely below 70 degrees Celsius. If it heats up more than this, improve airflow or dust the cooling parts.
Testing the temperature of an amplifier is a necessary step when you learn how to test an amplifier at home. It helps you know if your amp works safely or needs service to prevent damage.
How to Test an Amplifier Without a Multimeter?
You can test an amplifier without a multimeter using sound and signal checks.
- Play a test tone, low or mid-frequency, directly into your amp input. Listen carefully through the speakers for distortion, static, or silence. If the sound is clear and loud, your amplifier is likely working.
- Another way is using software signal generators on a phone or computer, feeding tones through the amp. Visual checks are helpful too. Look for indicator lights, check if fans run, and feel if the case warms up.
These tests show basic amplifier health and are useful when learning how to test an amplifier to see if it works without special tools. For more detailed results, combine these with careful listening and compare with a known good amplifier.
| Test Type | Purpose | Tools Needed | Steps Summary | What To Look For | Common Fixes |
| Visual Inspection | Check physical damage | None | Look for burns, loose wires | Visible damage or corrosion | Repair/replace wiring or parts |
| Power Supply Test | Confirm input voltage | Multimeter | Measure DC voltage at power input | 11-14V typical | Check fuses, wires, battery |
| Continuty Test | Ensure no breaks in wiring | Multimeter | Probe across wires or fuses for beep | Continuity beep/low resistance | Repair broken wires or connections |
| Speaker Output Test | Check sound from speakers | Known good speaker | Connect speaker, play audio | Clear, no distortion | Replace cables, check amp output |
| Signal Injection Test | Trace audio signal through amp | Signal generator | Feed signal, check output at stages | Signal presence or loss | Track faulty stage |
| Gain Test | Measure signal amplification | Multimeter | Measure input/output voltage | Gain within specs | Adjust or repair gain circuits |
| Oscilloscope Test | Inspect waveform quality | Oscilloscope | Connect to output, check waveform | No clipping, clean waveform | Repair distortion sources |
| Frequency Response Test | Test audio across frequencies | Signal generator | Sweep frequencies, measure output | Consistent response | Repair frequency-related faults |
| Noise and Hum Test | Detect unwanted noises | Speaker, multimeter | Amp idle, listen and measure hums | Minimal noise/hum | Fix grounding or interference |
| Temperature Test | Check amplifier heat under load | Thermometer | Run amp, monitor temperature | Stable temps | Improve cooling, check faults |
Amplifier Testing – Troubleshooting Common Issues and When to Seek Help
You might run into common problems when testing your amplifier. These include no sound, distorted audio, low volume, humming noises, or overheating.
- Start by checking the wiring and connections to make sure nothing is loose or damaged.
- Look for blown fuses or faulty power supplies. If your amplifier cuts out when it gets hot, it might need better ventilation or could be overheating internally.
- If one channel is silent, test speakers and RCA cables to isolate the problem.
Simple fixes like tightening connections often help. But if your amp still shows trouble after these checks, such as persistent noise or no output, it is time to seek professional repair to avoid causing more damage.
Wrapping Up…
How to test an amplifier at home is important knowledge for sound quality and gear care. We tried covering every basic to advanced testing techniques to help you find faults early and handle them safely.
Using the right tools and following instructions protects you and extends your amplifier’s life. If repairs seem too much, professionals can help.
Testing is art of good upkeep, so check your amplifier regularly to enjoy clear and powerful sound longer. Take the steps now for peace of mind.