Are you unhappy with your car’s factory-installed audio system ? Do you feel like you are missing some of the notes of songs you have been listening to for years ? Do you feel like something’s off ? Do the vocals sound muddled or the track metallic ? Do you think there’s not enough bass ? Do you wish the head-unit had Bluetooth so you could stream songs without wires directly from your smart phone ? Do you wish the stereo had GPS navigation so it’d be easier for you to find your way around the city ?
If the answers to most of the questions above is a resounding ‘Yes’, then you probably need to revamp your car sound system.
Car Audio Design – A Detailed Study :

Diagnosing The Problem :

Before you overhaul the system, it is important to diagnose the problem and understand what is causing it. You need to get to the source of the issue. Could it be the stereo ? Could it be the speakers ? Could it be the amp ? Understanding where the snag lies will help you identify the component that needs replacing.
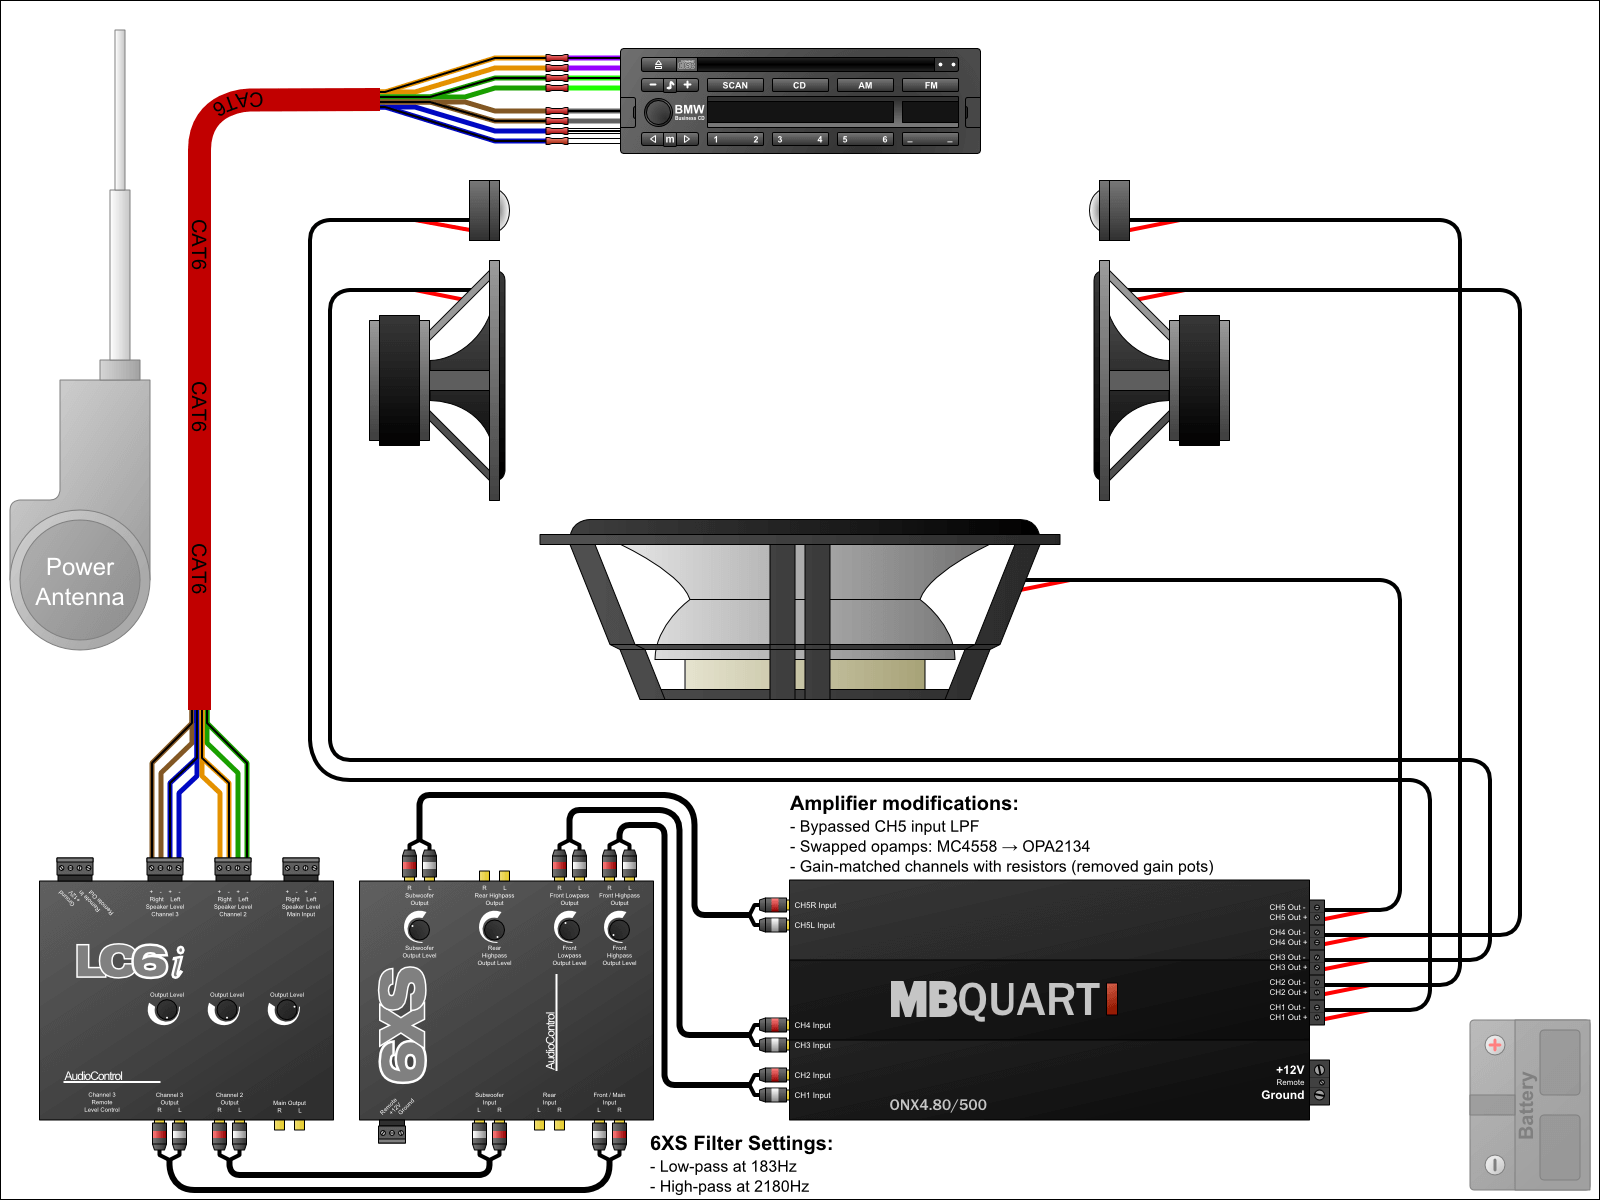
A car audio system has many parts. It has the stereo which is the centerpiece that drives the other components. It is also known as the receiver or head-unit or radio. Then, there are the speakers, the amplifier, the crossovers and the subwoofer. There are also mounting gear, wiring kits and special padding material that fall within the ambit of a car audio system.
If your audio is not up to the mark, you are probably listening to a sub-standard receiver that’s struggling to power feeble factory speakers. It might also be that you need a more powerful amplifier or subwoofer or compatible crossovers. Sometimes, it might not be easy to pin point what is causing the issue. But the good news is, it is not all that difficult to figure it out. You don’t need to be an audiophile to dissect the problem. All you need is a keen ear and an attention to detail. Here are a few steps to help you get to the root of the issue.
Listen For A While In A Noise-Free Place
The first thing you need to do is listen for a while in a peaceful environment. You could do it in your driveway or office parking lot. Start by twisting all the knobs and pushing all the keys. Regulate the balance and tone. Study the sound at different volumes from lowest to highest. Listen to each speaker individually and pay attention to how each one responds to the change in controls. See if you can detect anything – a slight off-key note, a grating tinny sound, a buzz, anything that suggests a departure from the norm.
Hit The Highway And Listen While Driving
Next, turn on the ignition and get on the highway. Listen to the music while driving. You will be surrounded by ambient noises like traffic, engine and wind sounds. Turn up the volume and check if the speakers are working fine. Tweak around with the controls like before and see if you hear anything strange.
Park The Car And Continue Listening At Highway Volume
Finally, find a place to park your car, but do not lower the volume. Keep it at the same highway level so that the road noises fade off and you are left with just the sound from your car audio system. What do you hear now ? Does the sound seem different ? Keep the tone, balance and fader controls at the midway mark. Study the overall sound quality. How do you feel about it ? What do you think is lacking ? Intelligibility ? Bass ? Treble ?
Now, rate the components on a scale of 1 to 10, 1 being the least desirable and 10 being the most. Once you’ve done this, the fog will most likely clear out, and you will know which component is giving you trouble.
In a large number of cases, changing the car receiver solves most of the problems. That is because the receiver is the one that sends the signal to the speakers and most of the fine-tuning happens inside it. As aftermarket receivers are more sophisticated than factory-installed variants, they are better equipped at sending an accurate and boosted signal to the speakers. Also, if you are looking for additional features like Bluetooth connectivity, USB port, satellite radio capability, etc. the best thing to do is to replace the head-unit.
If the receiver is not the problem, you might want to check out your other components. If, for instance, your speakers sound good at medium volume but the sound starts cracking at higher decibels, you probably need an amplifier to power the speakers. If the speakers sound tinny all the time, you should probably replace them altogether. If the music lacks bass, you should consider getting yourself a car subwoofer. If your car is too noisy and constantly makes rattling sounds, it might be a good idea to line your vehicle with some solid sound deadening material.
In the following segment, we will analyze different components and help you understand their unique requirements.
Receiver :
If it is the receiver that needs replacing, we suggest you start by asking yourself a few basic questions such as:
- What does my existing receiver lack ?
- Does it need more power ?
- What extra functions do I want ?
- How much am I willing to spend on the new receiver ?
To help you find answers to these questions, allow us to walk you through the fundamentals of a car receiver.
What Is A Receiver ?

A receiver is the main unit of a car audio system. It is the shiny device mounted to your car dash. It has buttons, knobs and a display. It plugs into a power source for current. The primary job of a receiver is to receive the audio signal from a source device, process it and send it on its way to the speakers. It also has a number of adjustable functions for fine-tuning the input signal to generate a customized sound.
Parts Of A Receiver :
A standard car receiver has 3 main parts : source, preamp and amplifier.
Source: This is the part that takes in the input signal. It lets you choose your media source which could an AM/FM radio tuner, satellite radio, smartphone, iPod, USB flash drive or CD/DVD player.
Preamp: This is the part that processes the input signal and gives the signal a slight boost to prepare it for the amplifier. It allows you to select the source, and tweak the volume, tone, balance and fader. It also lets you tune the signal using sophisticated controls like crossovers, equalizers and time correction.
Amplifier: This is the part that further boosts the low-voltage signal coming in from the preamp and converts it into a high-voltage signal and routes it the speakers.
Reasons To Get A New Car Stereo :
Better sound
An aftermarket car stereo has more power than a factory receiver. It has a well-designed circuit and quality crossovers. It delivers a cleaner and more powerful signal to the speakers, and the final sound is more distinct and nuanced.
More audio sources and other functions
One of the biggest reasons why people switch to aftermarket stereos is the higher number of source and playback options. There are also other important functions, not related to music, which might prove useful in a car stereo. Here are the top reasons why you might want to go for a new receiver:
- MP3/WMA/AAC playback.
- Bluetooth connectivity.
- Route hands-free calls through the car stereo.
- Android and iOS compatibility.
- Satellite radio readiness.
- DVD music.
- Support for music apps like Spotify, Pandora, etc. and similar mobile app-based sources.
- GPS navigation.
- Touchscreen display.
Better customization
Most aftermarket receivers come with sophisticated precision controls like digital time correction and parametric equalization for customizing the audio. They help you adjust the output to your needs for a more personalized listening experience.
Better aesthetics
Aftermarket receivers are more elegant-looking. Unlike drab factory stereos, they frequently feature attractive multi-color touch-sensitive displays with customizable backgrounds and built-in illumination that beats in sync with the music. They make the dash area livelier and enhance the overall décor of the vehicle.
Expandability
Aftermarket stereos have numerous inputs and outputs for expanding the system. They have AUX inputs, USB ports and Bluetooth for music input. They have outputs for adding external amplifiers, subwoofers, portable music players and rear seat video screens.
Better security
Aftermarket receivers have better security features like detachable face plates and security codes to prevent theft.
Finding The Best Fit :
Car receivers come in various makes and shapes. They have their unique functions and specialties. Following are the 4 main types of receivers. We advise you to choose the one that best meets your requirements.
CD receivers: These receivers play CDs. They also feature other input sources like radios, USB and 3.5mm AUX inputs. They are available in both single-DIN and double-DIN sizes.
Digital media receivers: These receivers play music from a variety of digital sources like smartphones, music players and online music streaming apps. They do not play CDs and DVDs. If your car dash does not have space for a CD receiver, you can go for a digital media car stereo.
DVD receivers: These receivers play DVDs and CDs. Most models work with smartphones and have touchscreen displays. Some latest models also support Apple CarPlay and Android Auto and offer a seamless touchscreen experience.
Navigation receivers: These car receivers are a boon for people who travel a lot. They are also useful for people who struggle to find their way around a place. Navigation stereos have built-in GPS so you don’t have to depend on your phone for directions. Their features are similar to DVD receivers and they are compatible with digital media devices.
Can Factory Speakers Work With A High-Power Aftermarket Stereo ?
Ideally, your factory speakers should be able to cope with the high-power input from a new stereo. However, if you notice the sound breaking at high volume, you might want to stay below that limit to keep the sound even. In any case, if you desire top-quality sound with plenty of detail, the best option is to switch to aftermarket speakers. They are better equipped to handle very high and very low frequencies. They accurately reproduce the high-power audio signal coming in from the aftermarket stereo. No part of the signal goes unprocessed and every note is precisely recreated.
How To Install A Car Receiver ?

There are 3 parts to the installation process:
- Removing the old stereo
- Wiring the new stereo
- Installing the new stereo
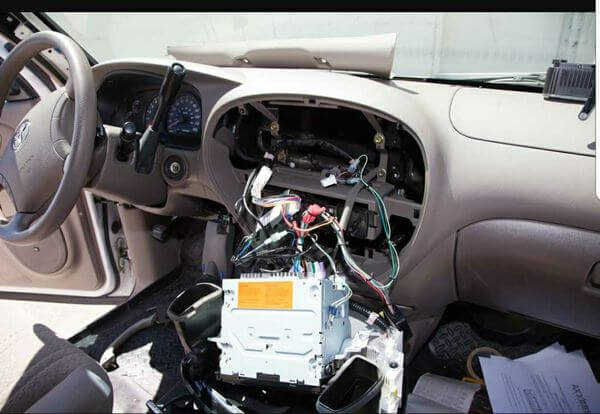
Removing The Old Stereo
This is a very critical job. You will need a few tools like screwdrivers and wrenches. You will also need wire strippers and electrical tape for the wiring process. We recommend using panel removal tools to avoid leaving scratch marks on the dash surface while prizing out the radio from the dash panel.
The first thing you need to do is set the parking brake and remove the negative wire from the car battery to avoid inadvertently short circuiting the system.
Once you’ve done this, it’s time now to remove the stereo. A car stereo may be mounted to the dash in 3 ways:
- It might be secured to a metal mounting sleeve with the help of spring clips.
- It might be screwed to the dash panel with mounting brackets.
- It might be mounted to a rail system inside the dash panel.
In the first case, use a DIN tool to release the spring clips. Insert the DIN tool into the holes on either side of the radio. You will hear a soft click when the spring clips release. The DIN tool hooks onto the side of the stereo so it can be pulled out easily. After you hear the click, gently push the tool apart and pull out the stereo from the dash.
In the second scenario, you might have to peel away some trim panels from the dash. Look for hidden pressure clips and other screws holding the panels down. Be careful not to damage the dash surface. Once you have removed the trim panels, you will be able to access the car radio. Locate the screws securing the radio to the dash, remove them and pull out the device.
In the last case, the stereo might be mounted to a guide rail inside the dash. You need to remove the screws and spring clips to release the stereo, and gently slide the stereo off of the rail. Please note that the chassis of your aftermarket stereo might not fit the guide rail. In that case, the guide rail might have to be removed altogether and you might not be able to reinstall the old factory stereo.
Unplugging the old stereo
Your factory receiver has a wiring harness at the rear end. It hooks the device to the car’s electrical system for power and also connects the stereo with the speakers. Once you have released the stereo from the dash panel, you need to unplug it from the wiring harness and also unplug the antenna to fully detach it from the dash. This completes the removal process and we move to the next phase which is wiring the receiver.
Wiring the new receiver
Wiring is very vehicle-specific. Adapter wiring harnesses are available for connecting aftermarket stereos to factory wiring harnesses. They are usually color-coded and carry diagrams in their user manuals to help with the wiring process. The new stereo will also have a similar diagram in the manual. We advise you to go through both the manuals and carefully follow the diagrams and wiring guidelines.
If a harness if unavailable, or if the factory stereo plug was removed, you will have to individually indentify the wires on the factory receiver and connect them to the corresponding wires on the new receiver. Avoid taping the wires together. The adhesive will most likely dry up after a time, leaving the wires exposed and susceptible to short circuits.
There are 3 ways to connect the bare wires:
Soldering: It establishes a permanent connection and guarantees maximum current transfer. For a professional-grade insulated connection, we suggest using heat-shrink tubing and a heat gun.
Posi-Product connectors: These connectors are used for quick and easy connections where the wires are twisted together. They offer a secure connection and can be reused.
Crimping: Crimping is an effective way to connect wires. Make sure the crimp connector is the right size. Types of crimp connectors include bullet connectors, butt connectors and crimp caps.
Power wires
In our opinion, it is always better to connect your new stereo wires to a wiring harness. But, if the option is not available, you will have to make a direct power connection and for that it is important to know the difference between switched power and constant power.
A switched power source turns on only when you fire up the ignition. It is a power-efficient method and conserves your car battery. If you connect your receiver’s red switched power lead to a switched power source, the receiver will automatically power off when the ignition is turned off.
A constant power source is always on. If you connect your receiver’s yellow memory lead to a constant power source, you will enjoy constant power and your clock setting, radio presets and tone presets will not disappear every time you turn off the ignition.
Speaker wires
Most car receivers have 8 wires for the standard 4-speaker set-up. Each of the front left, front right, rear left and rear right speakers are wired with a positive and a negative wire. There may be slight variations though, depending on the vehicle and the wiring harness used.
Ground wire
The ground wire is mostly black. It needs to be in constant contact with bare metal for the receiver to work. A loose ground connection can lead to distortions.
Taping receivers with touchscreen displays/video monitors
If your new stereo has a large display or monitor, it must be connected to your vehicle’s parking brake wire or hand brake wire or emergency brake wire. The connection turns on the display/monitor when the brake is pressed or pulled.
Installing the new stereo
There are different ways to install a new car stereo receiver. If the old stereo had mounting brackets, you might want to try them out on the new stereo to see they fit. Remove the plates from the old stereo and affix them to the sides of the new stereo. If they don’t fit, you might have to get yourself a mounting kit. A mounting kit helps you install the new radio in the dash. You might have to mount the kit to the dash first, and then slide the new stereo’s mounting sleeve into the kit. Alternately, you might have to first screw on the kit to the stereo, and then affix the pair to the dash with screws.
Once the mounting brackets are in place and the stereo is ready to be inserted into the dash, connect the wiring adapter of the new stereo to the wiring harness of the vehicle. Then, connect the antenna wire. Finally, connect the remaining wires which may include AUX cable, USB cable, Bluetooth microphone wire, steering wheel control panel wire, etc. to the back of the stereo.
Testing
Before you push the stereo into the dash, it is good to cross-check all the connections. Gently ease the receiver into the dash opening and see if it sits well. Test all the functions of the receiver and check if everything’s working fine. Reattach the battery, fire up the stereo and check all the sources like USB, AUX, FM, DVD, etc. Twist the tone, balance and fader controls, and see how each speaker responds. It is best to fix any anomalies that might be at this stage while the apparatus is still unhinged. Once you are sure everything is working perfectly, push the receiver into the slot on the dash and snap it in place. Reattach any trim panels you may have removed and your car stereo installation is done.
Speakers :
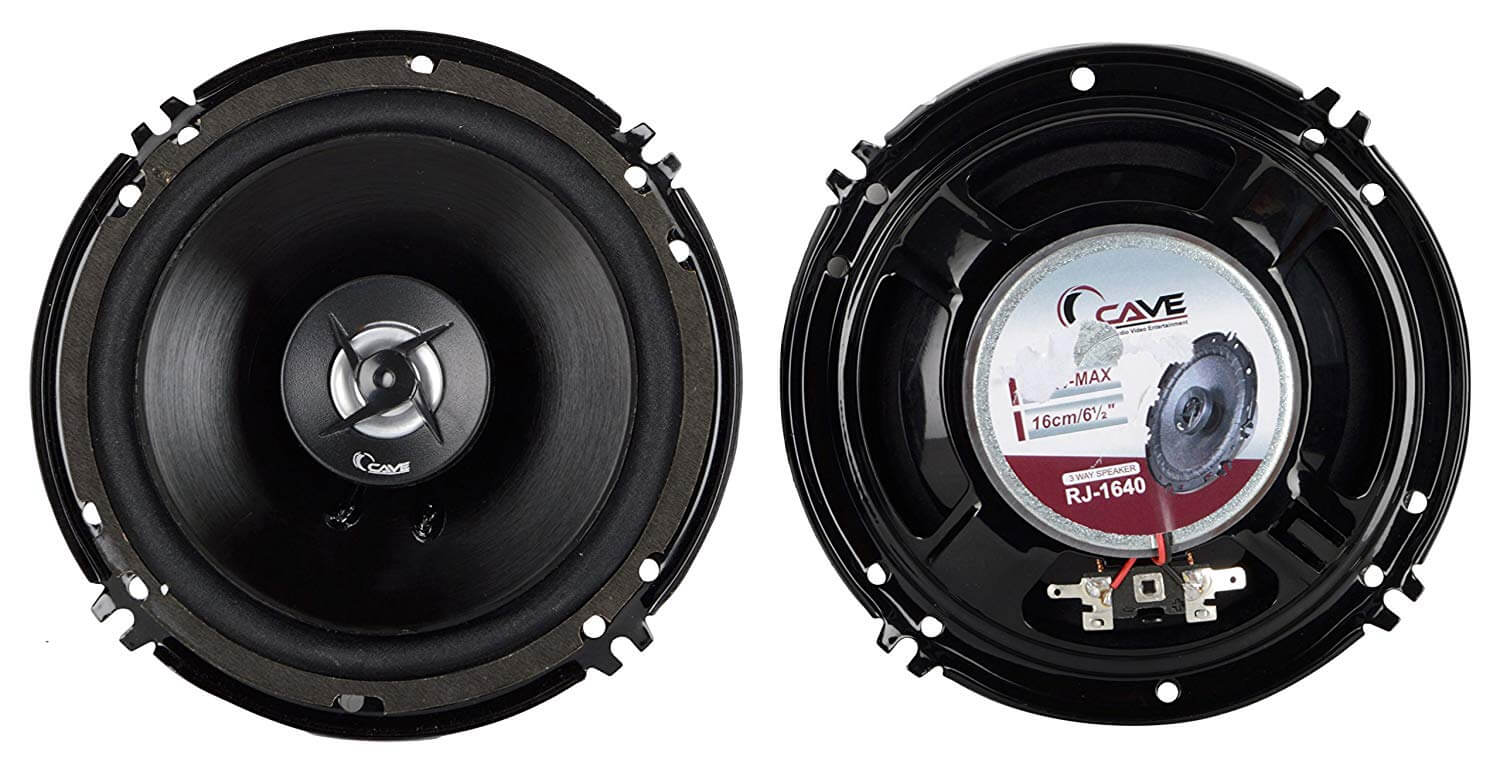

If you are certain the problem is not with the receiver but rather the speakers, we suggest you get an aftermarket set of speakers. Factory-installed speakers are often made of paper or other cheap material. They are not very durable and may give if played constantly at high volume. They are built for moderate output and have average sound quality.
Reasons To Get New Speakers :
Better sound
A new set of car speakers can completely transform your car audio experience. Aftermarket speakers are full-range speakers with greater power handling capacity. They have advanced crossover circuits that make sure each driver receives the correct frequency band. There are tweeters, midrange speakers and woofers for handling high, midrange and low frequencies respectively. They produce soaring high notes, crisp midrange and deep rumbling bass. Vocals are crystal clear and instruments stand out with all their brilliance.
More power
If you like listening to music in high volume, you should definitely get yourself an aftermarket set. Their sound is far cleaner and crisper and has greater harmonic detail. The tone is better and does not break at high volumes. In order to take full advantage of the speakers, you might have to buy an outboard amplifier as the factory receiver might not support high-power speakers.
Durability
Aftermarket speakers are made from durable materials like polypropylene, rubber, steel and aluminum. They are built to withstand constant vibration and high volume output in outdoor conditions. They are resistant to humidity and extreme temperatures and have a longer service life than factory speakers. You can buy foam speaker baffles to protect the car speaker boxes from moisture and dust.
More options
For the best car audio set-up, we suggest component speakers with separate tweeters and woofers as they are better suited to the unique requirements of a car. You can add a kick panel enclosure to hold the speakers in an ideal position for better stereo imaging. It concentrates the sweet spot on the driver’s seat and enhances the overall audio quality.
Alternately, you can go for coaxial speakers with a 2-way or 3-way configuration. They are equally great and produce accurate and powerful audio. If you want extra-crisp highs, you can add an inline bass blocker. It is a sophisticated high-pass filter that sends a cleaner high band to the tweeter.
Installing Car Speakers :

Installing car speakers are not all that difficult. You can do it yourself provided you have the right tools. Each vehicle has a different layout, and hence, presents its own set of challenges with respect to installation. The speakers you buy will also have their own unique needs. Some speakers might fit right into the old speaker openings on the dash and doors. Others might need mounting brackets and some drilling and sawing to fit in.
If you buy component speakers, the tweeters, woofers and crossovers will have to be mounted separately. The woofers will most likely fit the factory speaker holes but the tweeters will have to be custom installed. You might have to drill holes in the door panel, sail panel or dash to accommodate the car tweeters.
Dash speakers
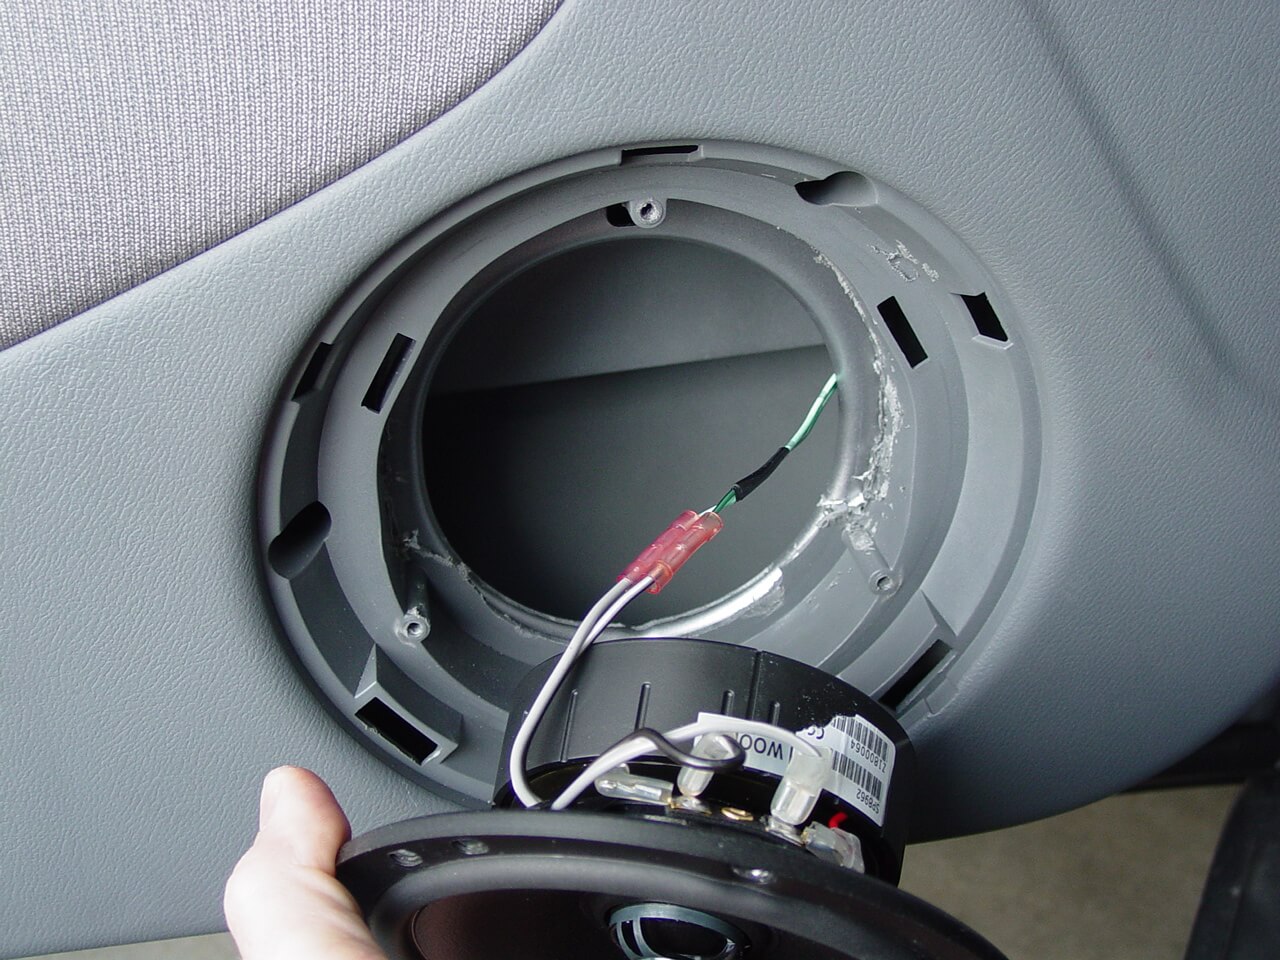
The factory speakers on the dash are easy to detach. Just remove the screws or friction fittings, and take off the grilles. You might need special 90ᵒ screwdrivers to access screws in tight places. Be gentle. Do not apply too much pressure if a grille refuses to move; it might be bolted to the surface with screws or studs from behind. Locate the screws and unscrew them to release the grille.
Once the old speakers have been removed, connect the new speakers to the wiring harness. You may also solder or crimp the joints, if required. Take care to match the terminals correctly. You may use electrical tape but it has its drawbacks. It might not hold up in high temperature as mentioned earlier and might fall off.
Door speakers
Removing door speakers is similar to removing dash speakers. You need to remove the screws and friction fittings to release the grille. There might be a sealant or foam which you may have to cut with a knife. Unplug the factory wiring harness and detach the speakers. Now, attach the new wiring harness to the new speakers, and connect the other side of the new harness to the factory wiring harness. If you do not have a wiring harness, you can also use a set of Posi-Products to attach the speakers. Test the speakers and see if they’re working properly. When you are sure everything’s alright, install the speakers into the openings and fasten the grille.
The above method applies if you do not need to remove the door panels to install the new speakers. But, not all vehicles have the same design. In most cases, the door and window panels have to be removed to get to the factory speakers. For that, you will need a special set of panel tools to carry out the installation.
Important Note: The process of installing car speakers is very detail-oriented and vehicle-specific. Depending on the speaker type (component, coaxial, etc.), the speaker mounting location (dash, door, rear, etc.) and the vehicle type (hatchback, sedan, truck, etc.), you will be faced with a different set of challenges. The above mentioned process is just a brief guide. We suggest you first get a hang of what your car demands and then do your research regarding the installation process.
Adding A Car Subwoofer :
A subwoofer is a specialized loudspeaker for bass. If you feel like the music is lacking in bass, adding a sub would be a good idea. A sub enhances low frequencies and makes the track deeper and fuller. It also elevates the sound and improves its overall performance.
Passive and active subs
A sub requires more power because low end frequencies are energy-hungry. To drive an aftermarket car bass speaker, you need an external amplifier to boost the low-voltage signal. However, if the subwoofer has built-in amplification, an external amp is not required. The call is yours. You can get a passive subwoofer, and drive it with an outboard amp, or you can get an active subwoofer, if you desire a simpler set-up. However, if you have a large sub like a truck subwoofer, an outboard amp is a must.
Another option is to get a high-power car stereo to feed your existing factory speakers with high-power low-end signals. You will notice a big improvement in the bass output of the speakers. It is an economical option for those who want to enhance the bass signature of their car audio without investing in a subwoofer.
Power rating of a subwoofer
The power of stereo parts is denoted by peak and RMS power. Peak power is the highest amount of power the device is able to produce at any given point in time while RMS power is the continuous or average power it is able to put out over a period of time. Since a sub requires more power, you should dedicate more power for it than your full-range speakers. For instance, if your receiver puts out 20 watts RMS for each of the 4 channels, make sure your sub gets at least 80 watts. If you are using an external amp to drive your component speakers, and it puts out 50 watts for each of the 4 channels, reserve at least 200 watts for the subwoofer.
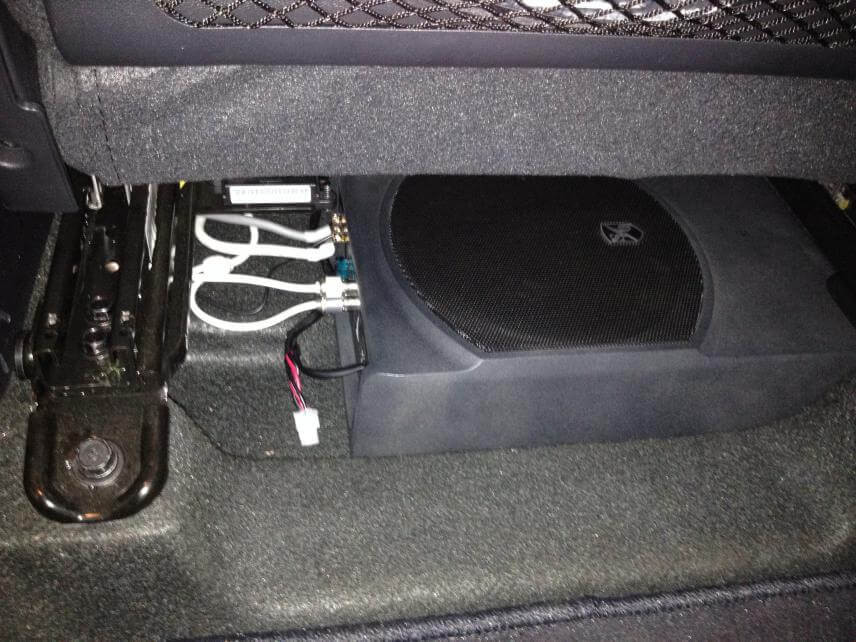
Installing A Subwoofer :
Most aftermarket subwoofers are unpowered and component in nature. You need to connect them to an external car subwoofer amplifier for current. You also have to install them in a subwoofer enclosure which can be purchase separately.
Installing a component sub is not very difficult and can be done in minutes. First, wire the sub to the terminal cups. Then, mount the sub to the enclosure with the help of screws. Next, hook it up to an amp, and finally place it in a strategic location, preferably the trunk of a car. Component subwoofers offer greater customization. You can choose the subwoofer, match it up with an appropriate enclosure, and throw in an amp that best serves the sub configuration.
Some subwoofers have a free-air design, meaning they do not require an enclosure for installation. Some are ready-made and come pre-installed in an enclosure. However, they need a power source and have to be connected to an outboard amplifier. There are various types of ready-made subs and some have as many as 3 subs inside a single enclosure. If you own a large car like a sedan, the best place to mount a pre-installed sub is the boot of the car.
For a powered under seat subwoofer, installation is fairly simple. Just find an appropriate spot for the sub, ideally under the driver’s seat or passenger seat or the hatch area, and mount it with the help of Velcro or the included mounting equipment. Since the device already contains a built-in amp, you just need to connect it to the receiver for the input signal and run the ground wires.
Car Amplifier :
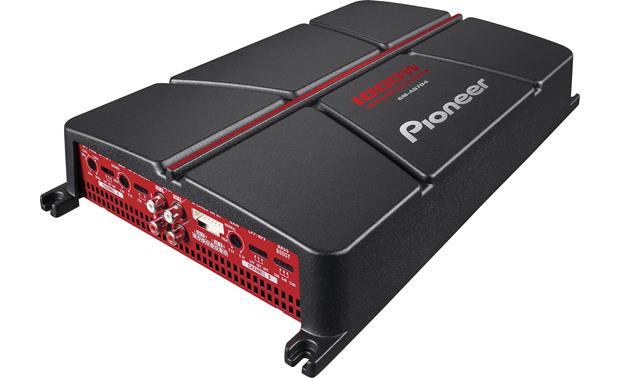

Adding an amplifier is the smartest way to get the most out of your high-end speakers. Without a good amp, your speakers will be deprived of the power they need to function at their optimum level. A separate amp ensures that the signal is cleaner and more powerful. A factory receiver may supply 50 watts peak power per channel to your 4 speakers, but it is not the same as an external amplifier with 50 watts RMS power for each speaker. The signal from the amp will be way more potent, and your music will be louder and wider and deeper.
Installing An Amplifier :
An amplifier generates heat. Therefore, it needs to be installed in a place with sufficient and constant air circulation. Mount it in a place that is easy to access. Most amps do not include wiring, so you will have to buy an amplifier wiring kit and some speaker wires to set the thing up.
First, disconnect the negative terminal of the battery to protect against shocks. Then, run the power cable from the battery to the amp. Hook up the signal cables, the turn-on cables and the ground wire. Then, run the speaker wires from the amp to each of the speakers (if you are using the amp to power the speakers) or to the sub (if you are using the amp to power a sub). Finally, send the signal from the amp to the speakers to test the connections. If everything sounds alright, place the amp in a suitable location, reattach the negative terminals of the car battery and you are good to go.
Important note: Please refer a detailed amplifier installation guide to more details.
Other Factors To Consider While Setting Up Your Car Audio System :
Setting the car audio crossovers right
Crossovers play a vital role in any audio set-up. They are filters that ensure the correct frequency bands are sent to the speakers and subwoofer. If your speakers are powered by the stereo, and you also have a sub, use a high-pass filter to remove bass from the speakers, and a low-pass filter to screen higher frequencies from reaching the sub. This will ensure all the speakers get a clean signal and there is zero overlapping. You can also use the subsonic filter on your amp to remove ultra-low frequencies outside the hearing range of humans.
High-resolution music
Music is stored in digital devices in the form of music files. These files come in various sizes. The bigger the size of the file or the bit rate, the better will be the sound. But music files are often compressed to fit a large number of them in a single device. This might cause the music to lose some of its high and low frequency information and other minute details. To prevent this from happening, avoid using the default settings while creating the files. When you use your smart phone or iPod in your car, try not to compress the files. If you stream music from apps, look for settings that let you enhance the resolution of the files. You can also use music platforms that allow high-resolution streaming like TIDAL, HDTracks, Acoustic Sounds, HighResAudio, iTrax and Primephonic. Alternately, you can get yourself a high-res portable music player. These devices have a large memory for storing larger files.
[hr]
You can consider buying a marine receiver system if you are driving a convertibles.
You can consider buying an ATV sound bar for quad bikes.
[hr]
You are providing here some very useful and informative information about best shallow mount subwoofer. Which is very helpful for subwoofer lover. Thank you so much for your post.
What a great article to share. A great contribution especially for someone looking forward to buying a car subwoofer, amplifier and enclosure. If anybody wants to install a new one, this is the most effective share, that will be very helpful for the best choice. Thanks a lot for the post.
Thank you Claire. Happy that it helps you to find the right car audio setup.