Today we are going to discuss 5.1 channel home theatre systems. We are going to talk about the components that go into building such a system, the specific role of each component and their ideal placement options. We are also going to help you pick the right equipment, test your system’s sound and tell you how you can build a wireless surround sound system.
Before we begin, let us understand what the 5 and the 1 in 5.1 means. The 5 means five speakers: one central, two front and two rear. The 1 means the number of subwoofers the system has.
The speakers can be floor-standing, on-stand, bookshelf, wall-mounted, in-wall or in-ceiling speakers. The subwoofer is mostly stood on the floor.
Some home theatre systems have more number of devices like 7.1 channel and 9.2 channel systems. A 7.1 channel system has seven speakers and one subwoofer. A 9.2 channel system has nine speakers and two subwoofers. These systems are suitable for larger rooms with wide open spaces and a high ceiling. Now let’s dive deeper into the 5.1 surround sound system setup technicalities.
5.1 Surround Sound System Setup Guide – A Complete Know How :
Here are the topics we will cover in this article.
- Components of a 5.1 channel surround sound system.
- Role of different speakers.
- Matching speakers with room size and layout.
- Placement of speakers.
- How to build a Dolby Atmos and DTS:X surround sound system.
- How to build a 5.1 system with in-wall and in-ceiling speakers.
- How to test a surround sound system.
- Receiver for 5.1 home theatre system.
- Subwoofer for 5.1 home theatre system.
- How to build a wireless surround sound system.
Let us now begin our detailed analysis.
Essential Components Of A 5.1 Channel Surround Sound System
A 5.1 surround sound system consists of the following main parts :
Home Theatre Receiver
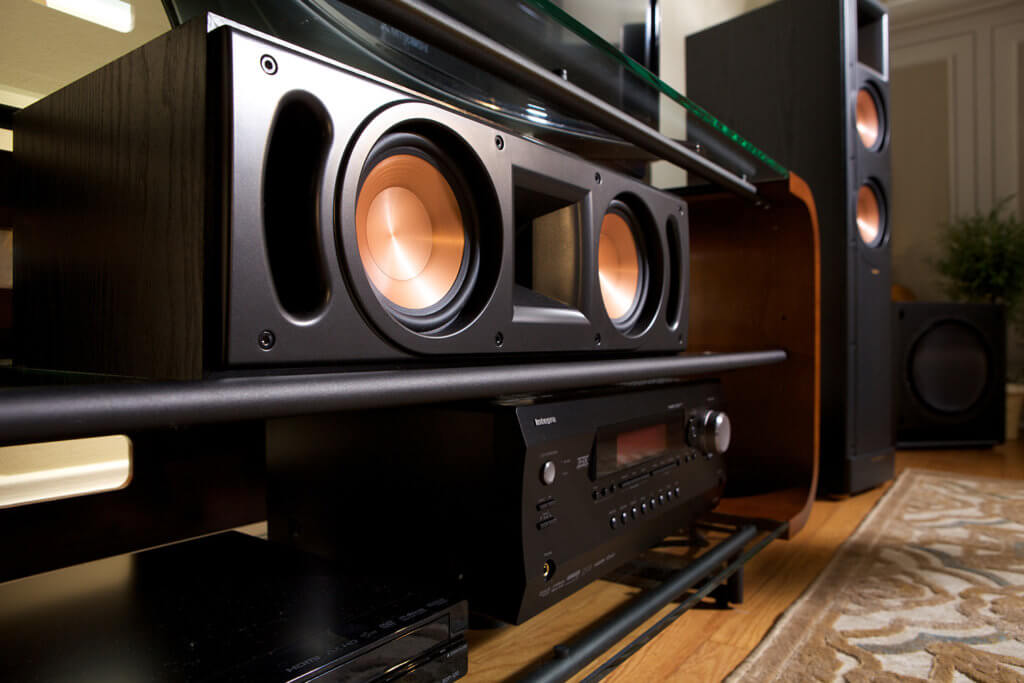

A receiver, also called head-unit, has two primary functions. First, it receives the audio/video signal from the source, and second, it powers the speakers. The signal received by the receiver is processed and played through the speakers. The multi-channel amplifier inside the receiver jacks up the incoming signal and sends it to the loudspeakers.
A Centre Channel Speaker
This speaker is located centrally either below the TV or above it. It can be wall-mounted or placed on a media console, table or rack. This speaker is aimed directly at the listener.
Dual Front Speakers
These are the two stereo speakers that flank the TV. The left speaker is responsible for the left channel sounds and the right speaker for the right channel sounds. Both face the listening position. They can be floor-standing speakers or bookshelf speakers. You can also mount them to the same wall as the TV if you like.
Dual Rear Speakers
These two speakers go behind or beside the listening position (depending on the space available and the layout of the room). They are pointed at the listener and they create surround sound effect. Rear speakers are best stood on stands or mounted to walls for optimal sound performance. There are also special speakers that can fire sound in different directions. For instance, there are top-firing speakers that project sound towards the ceiling which causes the sound to cascade down on to the listener. This feature is called Dolby Atmos and it is available on premium audio systems.
Subwoofer
A 5.1 channel system has a single subwoofer. It produces the low-end spectrum of sound called bass. It can be powered or non-powered. Powered means it has an internal amplifier; unpowered means it needs to be connected to an external amplifier.
Role Of Different Speakers
In a surround sound system, different speakers have different functions. Let us understand what these are.
Centre Speaker
The centre channel speaker is considered the most important speaker in the system as it produces around 50% of the soundtrack and most of the dialogues. It is also responsible for generating the centre stage sounds.
This speaker needs to be perfectly matched with the front and rear surround speakers. For instance, tower speakers need a larger, more powerful central speaker while bookshelf speakers can do with a compact central speaker.
Front Left And Right Speakers
The front left and right speakers produce the movie’s musical score and most of the special effects. The sound that emanates from these two speakers moves in sync with the events unfolding on scene. For example, if there’s a horse galloping on TV from left to right, the sound also follows the horse in the same direction and you can sense the movement of the sound. The front speakers seek to widen the soundstage so that you have a more spacious listening experience. Bookshelf, wall-mounted, in-ceiling and floor-standing speakers, all work great as front speakers.
Rear Left And Right Speakers
These speakers provide surround sound. They are mainly responsible for creating the ambient sounds in the soundtrack like the rustling of leaves and traffic sounds. They act as fillers, adding finer details to the track to make it more life-like.
Surround speakers can be divided into two broad variants: bookshelf and bipole/dipole speakers. The first are regular surround speakers you see on stands and walls. The second are more sophisticated speakers with multiple drivers inside them that project sound in different directions. It produces a diffused sound effect which surrounds the listener and offers a more wraparound audio feel.
Subwoofer
As mentioned already, the subwoofer produces bass. Bass makes the soundtrack deeper and fuller. Details like thunder and bomb explosions are captured brilliantly by a sub’s low-end sound production.
If you have a large room to serve with floor-standing front speakers, you might want to opt for a 12-inch or larger sub. If the room is relatively small and has regular bookshelf speakers in front, an 8-inch or a 10-inch sub will suffice.
Matching Speakers With Room Size & Layout

The first thing you need to consider while buying home theatre speakers is the size and layout of the room. Floor-standing front speakers are best suited for large rooms with open spaces. Bookshelf, on-stand, wall-mounted and in-ceiling speakers are more suited to smaller or medium-sized rooms.
If you have limited space for the sound system, even if the room is large, we suggest you go for in-wall, in-ceiling or wall-mounted speakers. They offer discrete placement options and stay out of the way of foot traffic.
If the TV is not the central focus of the room, go for compact bookshelf speakers. They don’t occupy much space and blend well with the décor of most modern houses.
The other thing you should consider is what you will be using the room for. If the room is a living room that children and pets have free access to, you might want to consider wall-mounted speakers so as to keep the floor free of cables. It is especially important if you have toddlers who play on the ground. Keeping the lower regions of the room free of electrical gadgets is necessary from a safety perspective.
If you use the room exclusively for watching TV and listening to music, we recommend floor-standing speakers. They are capable of generating room-filling surround sound and are typically louder than bookshelf speakers. If you are a gamer or an audiophile, you will certainly appreciate their sound profile.
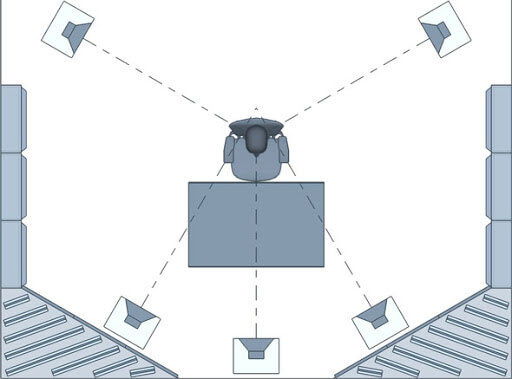
Placement Of The Speakers And Subwoofer
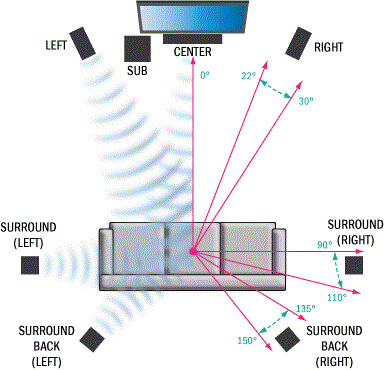

The placement of the speakers has a direct bearing on the audio quality of a surround sound system. The most expensive sound system in the world can perform poorly if the parts are not placed at their most advantageous positions. On the other hand, you can get more out of a regular audio system if you know where to place the speakers. Let’s take a look at which speakers go where in a 5.1 home theatre system. For this we are going to assume that the room is a medium-sized one with a couch in front of the TV that can seat three people.
Front Left And Right Speakers
Aim the front left and right speakers at the listening position which is the couch. To be precise, this position is when you are seated on the couch. The tweeters must be at the level of your ears when you are seated. Both the speakers must be angled towards the centre of the couch so that the audio is tight and accurate.
Place the front speakers are different distances from the wall behind them to see how they perform sonically. Try and strike a balance. Experiment with different positions and work out your own best positions based on your room layout and size. Remember, there is no one-size-fits-all solution, and every sound system will have its own requirements.
Centre Channel Speaker
A discussed already, this speaker goes under, above or slightly in front of the TV. It must be aimed directly at the centre of the listening position i.e. the midpoint of the couch. If possible, tilt the speaker so that the sound waves are at the ear level.
Rear Surround Speakers
In a 5.1 channel home theatre system the ideal position for the rear speakers is to the left and right of the seating position, not behind. You can mount them to walls or have them on stands. Placing them on the floor is not advisable.
Aim the speakers directly at the listening position. If the side position is not possible, place the speakers behind the couch and point them towards the TV in front. They should be placed a few feet behind the couch. For immersive sound effect, we recommend placing the surrounds one or two feet above ear level.
Subwoofer
Bass frequencies are omni-directional. This means our ears cannot tell the direction from which the bass is coming from unlike stereo speakers. Therefore, subs can be placed anywhere around the room. That being said, the distance of the sub from the wall does make a difference. The closer it is to the wall, the deeper is the bass output. If it is placed in a corner where two walls meet, the output will be higher still. The reason is that walls bounce back a lot of the sound waves which in turn enhance the bass effect.
A subwoofer needs a power connection and a signal connection. Power can be taken care of by plugging it into a wall socket, or better yet a power protection device. For signal you will need to hook it up to the receiver. The practical thing to do here is to place the sub somewhere close to the receiver and a power receptacle. Most people prefer to place the subwoofer on the floor near the receiver as it makes wiring easy. However, if the bass response is not good from such a position, you might want to consider getting a wireless subwoofer kit. A wireless kit offers more flexibility in terms of placement and lets you experiment with different locations to ensure best bass quality.
The good news is we now have a growing number of subs with wireless capability. These subs do not need to be connected to a receiver for signal input. The signal is sent to the sub wirelessly through a transmitter. Some subs have the transmitter inside the enclosure, others have it outside (available as an optional accessory). If you get a wireless kit, you can transform a cabled subwoofer into a wireless one in a jiffy.
But no matter how you manage the signal reception, wired or wireless, you will still need to connect the sub to a power socket, and for that you will have to place the sub near a power outlet.
Building A Dolby Atmos or DTS:X Surround Sound System
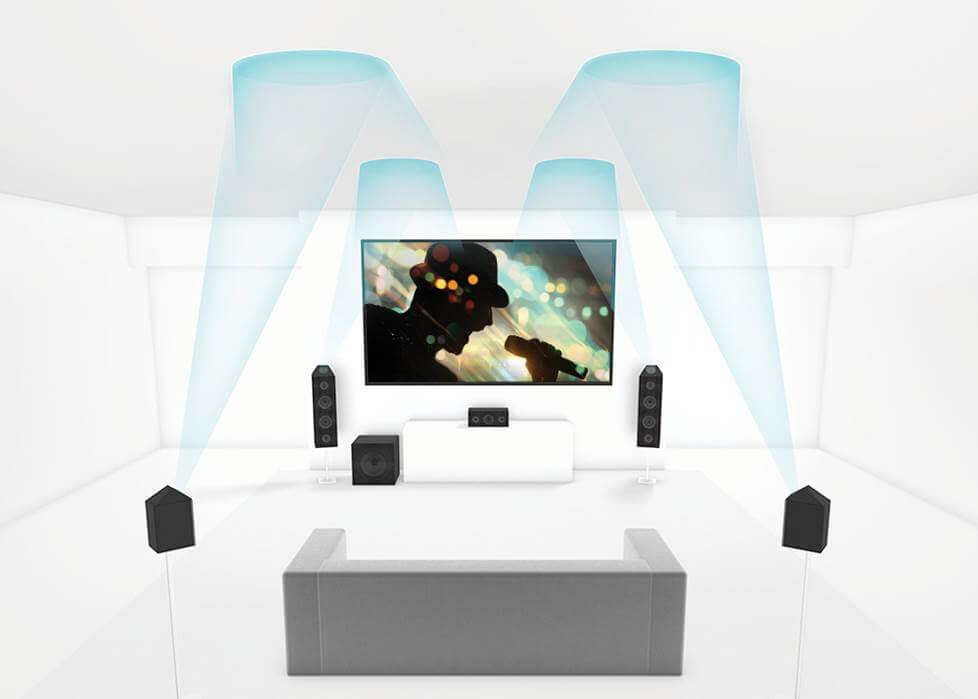

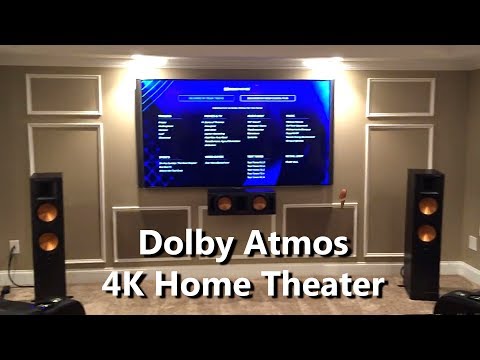
Dolby Atmos and DTS:X are two of the latest sound formats in surround audio technology. They have an object-based approach to surround sound. Atmos produces true surround sound using upward-firing speakers. Both the speakers and the receiver must be Dolby Atmos-enabled. The speakers project sound towards the ceiling from where it bounces back to the listening position. This creates an illusion of sound coming from above and provides a room-filling sound effect. Some Atmos receivers create this effect using in-ceiling speakers. In that case, sound rains down from the ceiling and engulfs the listener. The goal of Dolby Atmos is to produce 3D sound that moves in sync with the video. It is presently the most sophisticated and life-like surround sound format. Atmos only works in a 5.1, 7.1 or above setting. Check the below video for more clarity –
DTS:X works with any traditional 5.1 surround sound system. All you have to do is place the front, centre and rear speakers at their designated spots and the receiver’s built-in auto-calibration and object-based surround processor does the rest. This auto-calibration mechanism gauges the distance of the speakers from the listening position and analyses the acoustics of the room. It then decides the direction in which it needs to send the dialogues and sound effects.
One benefit of a DTS:X system is that you can manually adjust sound objects. For instance, you can boost the volume of dialogues in the centre channel while keeping the rest of the sounds unchanged. In other words, you can improve dialogue clarity without turning up the volume of the centre channel (which is responsible for bulk of the dialogues).
Tip 1: If you have the budget for it, go for a home theatre system that supports both Dolby Atmos and DTS:X technologies. You will be able to watch and listen to practically anything under the sun with the best surround sound on the planet.
Tip 2: If you want to use the same speakers for both Dolby Atmos and DTS:X, it might be a good idea to align your speaker setup according to the Atmos specifications.
Building A 5.1 Home Theatre System With In-Wall Or In-Ceiling Speakers
In-wall speakers
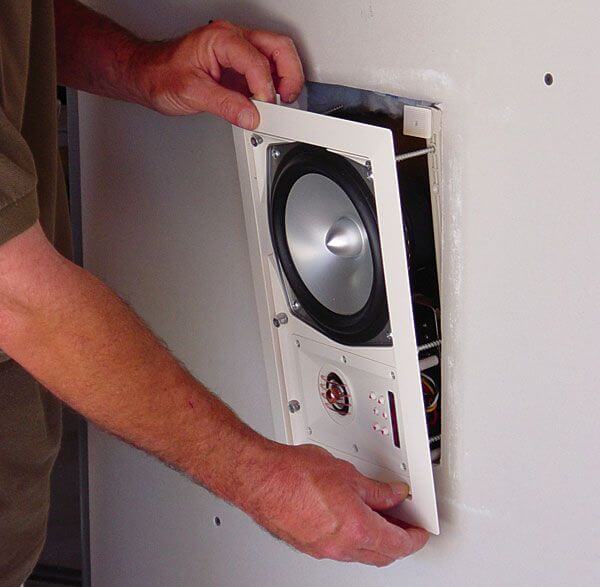

In-wall speakers are embedded into the wall. They don’t stick out of the wall surface and are mounted to cut-outs in the wall. If you want in-wall speakers in a dedicated theatre room, make sure they are at the level of your ears (or slightly higher) when you are seated on the couch. This position offers optimal surround sound. Both the left and right front speakers must be equidistant from the TV. Space them out. Do not place them right next to the TV. Allow a few feet’s gap. The centre speaker can go beneath the TV. Leave out a few inches between the top of the centre speaker and the bottom of the TV so that the TV does not obstruct the sound waves. All three speakers (left, right and centre) must aim the sound directly at the listener. The rear speakers must be mounted beside the listening position. They must face the listener and be at ear level.
If the room is used for multiple activities and you expect people to be mostly standing, place the speakers a little higher level so that they are aligned with the ears when a person is standing.
In-ceiling speakers
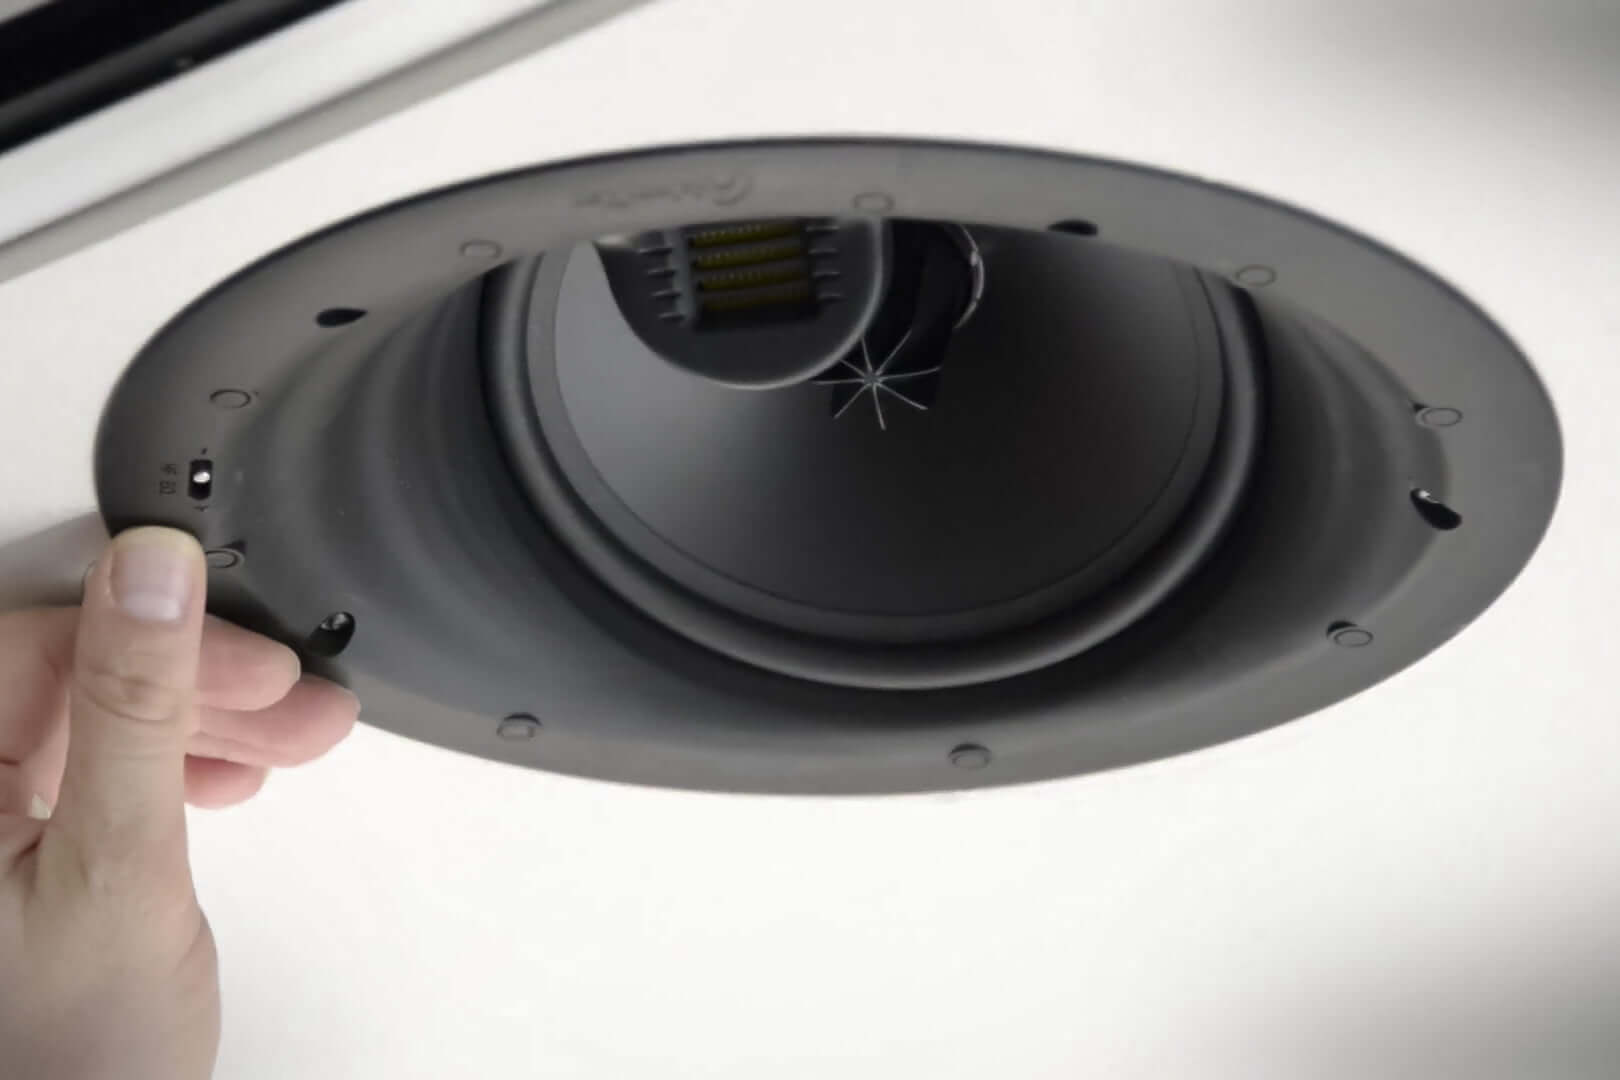

If you are using in-ceiling speakers, you might want to mount the front pair a little in front of the listening position and the rear pair a little behind the listening position. Don’t worry about placement accuracy; the auto-calibration of Atmos and DTS:X receivers ensures the sound is automatically tuned. The system studies the room’s layout and adjusts the sweet spot accordingly.
Tip: In both in-wall and in-ceiling speakers, it is advisable to leave a space of about 18-24 inches from the adjacent wall or ceiling. This is to prevent the sound waves from being obstructed by nearby barriers like walls and ceilings.
How To Test Sound Quality Of A 5.1 Home Theatre System
Most home cinema systems have auto-calibration. If your system has DTS:X, it already has this function. Such systems come with a microphone on a stand which needs to be placed in the listening position for gauging the sound. The stand makes sure the mic is at the ear level. Once you start the calibration process, the mic listens to the sound coming from different speakers at different volume levels. It relays this information to the receiver which then makes up for less-than-perfect speaker placement by automatically adjusting the speaker timing, audio output and equalization for each individual speaker. In other words, the receiver makes the speakers sound better just where they are. It measures the distance of the speakers from the couch and makes the necessary modifications so that sweet spot is focused on the listening position. You can do this calibration for multiple listening positions around the room. You just have to shift the mic and angle the speakers in that direction before starting the process.
Receiver For 5.1 Surround Sound System
A home theatre receiver is sometimes also called an AV receiver. It acts as the hub of all the inputs and outputs. The input ports takes in the input signals from the sources. The output ports send out the output signals to the TV, speakers and subwoofer. The source could be any audio, video or internet streaming device such as a cable box, streaming media player, turntable or Blu-ray player.
A home theatre receiver comes with built-in amplification. It has a multi-channel amplifier to drive multiple satellite speakers. The power rating of the receiver must be matched with the size and layout of the room, and the power requirement of the speakers.
Inputs And Outputs Of A Stereo Receiver
A receiver typically has a bunch of inputs and outputs on the rear panel. HDMI is the latest technology and so it would be wise to invest in a receiver that has HDMI capability. Also, go for a device that has more HDMI inputs and outputs than you need currently. This will leave room for system expansion in the future. For instance, if you wish to have two TVs going at the same time in two different rooms of the house, you will need two HDMI outputs on your receiver. You can connect all your video sources to the receiver and watch them on different TVs. This is known as multi-zone video. An HDMI zone output allows you to send audio and video signals to another room using a single cable. Receivers with multi-zone video function also come with multi-zone audio outputs.
In the absence of HDMI, an RCA or optical digital connection can also do the job. If you have a turntable, you will need a receiver with a phono input.
Bluetooth And Wi-fi
Most present-day home theatre receivers have built-in Bluetooth. This lets you play songs directly from Bluetooth-enabled sound sources like smart phones and tablets. They work with streaming services like Pandora and Spotify.
Apart from Bluetooth, many receivers have multi-room wireless capability. This function lets you play music in different rooms of the house using wireless speakers. You can create separate music zones. You can also control the playback in these zones from your phone app or through Alexa and Google Home voice commands. We will talk about how to build a wireless surround sound system with multi-room function in a subsequent section.
Placement Of The Receiver
The ideal place for the receiver is the media console below the TV. If you do not have a console, you can use a shelf or a table. Ensure there’s adequate room for ventilation. The panel of most receivers has vents to let out excess hot air. Take care to leave at least 3 inches of space empty above the receiver for free air circulation. If you cram the device into a narrow space, the heat will not get a chance to escape and the receiver might shut down due to overheating. Also, leave enough room at the back of the receiver for the connecting cables to pass. A couple of inches from the wall or back of the cabinet should be enough. We recommend media cabinets with removable back panels for easy access to the inputs and outputs of the receiver.
Most people like to keep their TV, receiver and other AV devices on a multi-shelved media console. But if you want to mount the TV to a wall and keep the receiver out of sight, we suggest you go for a component rack. If you are getting a component rack, make sure the remote has proper access to the receiver. There are two solutions. One, you can use an infrared repeater system which extends the remote’s reach to gadgets hidden in cabinets or located in other rooms. These gadgets use a receiver and wired transmitter to send the IR signal from the remote control to the receiver and other components.
The second option is to use the home wi-fi network to control the receiver through your smart phone or tablet. If your receiver has wireless or wired network connectivity, chances are it is also app-controllable. Download the app on your phone and manage the receiver remotely with minimal hassle.
Receiver Protection
To protect you receiver from fluctuations in power, plug it into a power protection device with multiple plug points. This will not only safeguard the receiver but also afford protection for the entire sound system. The additional sockets on the device can be used to plug in the TV, the set top box, subwoofer and other devices. Remember, if you connect the receiver directly to a wall receptacle, you put the entire surround sound system at risk.
Subwoofer For A 5.1 Surround Sound System
When choosing a subwoofer, the first thing you need to pay attention to is the wattage, the RMS power to be precise. Most brands highlight the peak power or maximum power of the subwoofer. But this can be misleading because peak power means the maximum power the sub can deliver at a given point in time. It does not mean it can deliver this amount at all times. To get a more realistic picture of the power handling abilities of a subwoofer you need to know the RMS power of the sub. This rating indicates the continuous power a sub is able to deliver over a period of time. Therefore, pay extra attention to this specification not just for the sub but also for the receiver and speakers.
So how much power should your subwoofer have? We would say an 8-inch sub with an RMS power of 150 watts is just about right for small rooms. A slightly more powerful one with a larger driver would be suitable for medium-sized rooms and so on.
Type Of Subwoofer
This is another thing you need to take into account while choosing a subwoofer for your 5.1 sound system. There are two main types of subwoofers: sealed and ported. Sealed subs, also known as acoustic suspension, have completely sealed enclosures. There are no vents for movement of air. They produce tight and accurate bass. If you listen to a lot of jazz, classical music and other acoustic genres, a sealed box would likely give you the best sound.
Ported subs have vents that allow air to move in and out of the enclosure. They produce more powerful bass than sealed subs without using additional power. However, they are larger than sealed boxes and occupy more space. Hence, they might not be suitable for rooms with space constraints. If you listen to heavy metal, EDM and hip hop, a ported sub is what you need.
However, if you are going to use your home theatre solely for watching movies, both sealed and ported subwoofers are fine and you won’t be able to tell the difference.
Passive bass radiators
If you want more bass without necessarily using more power, you can check out subwoofers with passive bass radiators. A passive bass radiator is an unpowered cone that moves in tandem with the powered cone. The pressure of the air inside the enclosure produced by the active cone moves the passive cone.
Tailoring the bass performance to the room
It is possible to tailor the output of your subwoofer to the acoustics of your room. Meaning there are room-correction software that let you modify the sound of your sub to match the size and layout of your room for the best bass performance. Advanced subwoofers with built-in digital signal processing let you tweak with the bass output to improve its quality and feel.
An alternative to this is investing in a smart sub. A smart sub doesn’t have too many manual controls but depends on app-based management. You download the app on your smart phone and make the necessary changes. The phone’s microphone captures a near-field measurement of the sub’s sound, compares how it sounds from the listening position and automatically adjusts the EQ to offer the best possible bass.
Connecting the subwoofer to the receiver
All powered subwoofers require a power connection and an input signal. The power connection can be taken care of by plugging it into a wall socket. We suggest using a surge buster to protect the subwoofer against sudden spikes or dips in power. For input signal, you can connect the receiver’s subwoofer output to the sub’s LFE (low frequency effect) input using a subwoofer cable.
Tip 1: If your receiver does not have a subwoofer output or if the sub lacks an LFE input, you have two options before you. One, you can use the stereo preamp-level connections by switching your sub out of LFE mode. Two, with some subs, you can connect your stereo’s front speaker outputs to the sub’s speaker-level inputs and then connect the front speakers to the sub’s speaker outputs.
Tip 2: If you want to avoid the rattling sounds in your room during high-impact bass, you might want to place an isolation platform underneath the sub. This will decouple the sub from the floor and significantly reduce the vibrations.
How To Build A Wireless Surround Sound System
Wireless surround sound system is the newest kid on the block. Different companies have their own versions of wireless 5.1 surround sound systems. There are 4 configurations to choose from:
Prepackaged wireless surround sound system: This is offered by Sonos. Here you get a soundbar with the centre, left and right speakers built into it, a wireless subwoofer and a pair of rear wireless speakers. JBL and Polk Audio also have similar prepackaged wireless systems.
Home theatre receiver that supports optional wireless rear speakers: This is offered by several brands among which Yamaha and Denon are the most promising ones. Both brands have the central and two front speakers wired to the receiver while the surround speakers are self-powered and wireless.
Soundbar with optional wireless rear speakers: This feature is offered by almost all the leading brands like Sony, Bose, LG, Bower & Wilkins, etc. In such a setup, the soundbar has the ability to connect with a one or two pairs of wireless surround speakers and one or more subwoofers to expand the system into a 5.1, 7.1 or above sound system.
Klipsch Reference Wireless system with WiSA technology: WiSA or Wireless Speaker and Audio is an emerging technology. Here there is no receiver and connecting speaker cables. A typical 5.1 channel surround sound system consists of a centre speaker, two front speakers, two rear surround speakers, a subwoofer and a special wireless home theatre transmitter that sends the signals wirelessly to the speakers and the sub.
Remember, by wireless we mean wireless transmission of signals. So speaker wires are absent. But power wires are still needed to power the individual speakers and subwoofer. AC power cables are provided for plugging the speakers into power supply outlets, or preferably, a power protection device. Some brands like JBL, however, have battery-powered speakers that dock into the soundbar cum receiver for recharging.
Hope you liked our detailed analysis on 5.1 Surround Sound System. Do post your questions below if you have any.